Applies to macOS Ventura through macOS 26
The short answer: the city, state and country a photo shows in Apple Photos are not in the photo. Photos looks them up from the coordinates every time you open the picture, and writes nothing back. To make the names travel with the file, they have to be written into the four IPTC location fields (sub-location, city, state or province, country), which is a separate step from geotagging and one that no camera or phone does for you. On a Mac you can do it by hand in Lightroom Classic or Adobe Bridge, by script with ExifTool, or in batch with a dedicated editor that proposes the names from the coordinates and lets you decide the wording before it writes them into hundreds of files.
A disclosure: I’m the developer of Media Location Tagger, the dedicated editor in the last of those routes. The tools you may already have are covered first, with an honest note on what each costs.
Three boundary checks, because place names are only one of the location jobs:
- Your photos have no location at all (a camera without GPS) → geotag them first; the names can be applied in the same pass.
- The photos have coordinates, and you want the names written in as well → this guide.
- The pin is right but the name is wrong, or the name is right and the pin is wrong → the second case is a coordinates fix; the first is this guide.
- You want the location taken out before sharing → the remove-metadata guide.
If the difference between coordinates and place names is new to you, the geotagging explainer covers it in five minutes; this guide assumes it.
What the IPTC location fields are
IPTC is the International Press Telecommunications Council, the body that standardised the metadata newspapers exchange pictures with: caption, credit, copyright, keywords and, among the rest, where the picture was taken. The location part is four plain-text fields:
| Field | What goes in it | Example |
|---|---|---|
| Sub-location | The least standardised one: a landmark, venue, park, neighbourhood, building, or room | Bennelong Point |
| City | The city or town | Sydney |
| State / Province | State, province, region, canton, département: whatever the country divides itself into | New South Wales |
| Country | The country’s name | Australia |
Two more exist that you will meet in Lightroom and Bridge: an ISO country code (AU), and the newer IPTC Extension fields Location Created and Location Shown, which repeat the same four names in a structured form and add a world region. The four classic fields are what almost everything reads, and what this guide is about.
In a JPEG, TIFF, DNG or TIFF-based RAW file they are stored twice: in the original IPTC block (the 1990s IIM format) and in the XMP packet Adobe introduced in 2001, under slightly different tag names. HEIC files (every iPhone photo since 2017), MOV and MP4 videos and a few RAW containers (CR3, RAF) have no room for the legacy block, so there the XMP copy is the only one. Well-behaved software keeps the two copies in agreement where both exist, following the Metadata Working Group (MWG) guidelines. Software that updates only one is the source of the “two apps show two different places” problem covered further down.
Who reads the fields: Lightroom Classic and Bridge (the Metadata panel and File Info), Capture One, Photo Mechanic, every digital asset management system, the upload forms of stock agencies and picture desks, and gallery software that prints “City, Country” under a picture. Who ignores them: Apple Photos, which maps the coordinates and shows a name it looked up itself; Google Photos, the Finder’s Get Info panel, and messaging apps. So a file with coordinates and no names looks located in Photos and blank everywhere on the first list.
Why your photos have coordinates but no names
Nothing writes place names at capture time. A phone records latitude and longitude on every shot, and stops there; a camera with a GPS receiver or a Bluetooth link does the same. The name you see in Photos, Google Photos or Lightroom’s Map module is the result of a reverse geocoding lookup: the app sends the coordinates to a map service and shows whatever comes back, without storing it.
That’s why the same iPhone photo says “Bennelong Point” in Photos, “Sydney Opera House” in Google Photos, and nothing at all in the stock agency’s upload form. And it’s why exporting from Photos doesn’t help: an export with Location Information ticked carries the coordinates and only the coordinates; the city, state and country fields in the copy are empty (checked with ExifTool on a current macOS 26 export). Lightroom’s italic address suggestions in the Metadata panel are the same thing: proposals, not in the file until you accept them.
The related complaint, “the map is right but the name is wrong”, is usually the lookup, not the file. A pin on the edge of a suburb gets the neighbouring suburb’s name; a village gets the nearest town; a state gets its abbreviation. The fix is the same as for the missing names: decide what the fields should say and write it in.
Where the names come from: two lookups and your own keyboard
Every tool that proposes a name is asking one of two kinds of database:
- An online geocoder. Apple’s map service (what Photos, Maps and any app built on Apple’s frameworks use), Google’s, or OpenStreetMap’s Nominatim. Detailed down to the building, needs an internet connection, and each has its own idea of what to call a place and where the boundaries are.
- An offline gazetteer. A list of populated places with coordinates, typically derived from GeoNames. Coarser (nearest town and its region, no street or venue), but instant, private, and fine for ten thousand files in a row. ExifTool has shipped one since version 12.78, and it’s the one Media Location Tagger uses for files that already have coordinates.
The two disagree more often than you’d expect. Apple may say The Rocks, the gazetteer North Sydney; one gives NSW, the other New South Wales; one returns Wien, the other Vienna; a photo taken on the boundary of two districts gets a different district from each. Neither is wrong, and neither is necessarily what the recipient of your pictures wants, which is the point of this section: treat every lookup as a proposal, settle your own conventions once, and write those. A few conventions worth deciding before you tag the archive:
- Full names or abbreviations. New South Wales or NSW, California or CA. Full names are unambiguous and what most agencies ask for; the abbreviation belongs in the ISO code, if anywhere.
- Local or English spelling. München or Munich, Firenze or Florence. Pick per archive, not per trip.
- What the sub-location is for. Landmark (Sydney Opera House), neighbourhood (Bennelong Point), or venue plus detail (Main Auditorium, Sydney Opera House) are all legitimate; a picture desk wants the neighbourhood, a stock library the landmark. Choose one use and stick to it.
- Country name form. United States or USA; United Kingdom, Great Britain or England. Again, once.
- Rural shots. A photo taken between towns has no honest city. Leave City empty and put the area in Sub-location; the fields are independent and don’t all need filling.
What won’t do it: Apple Photos, Preview, the Finder
None of the built-in Mac tools writes IPTC place names. Photos, as above, exports coordinates only. Preview’s Inspector shows the GPS tab and can remove a location, but has no fields to type a city into. The Finder’s Get Info panel is read-only. If your workflow is Photos and nothing else, you don’t need the names; the moment a file leaves Photos for anywhere on the “reads the fields” list, you do, and you’ll need one of the routes below.
Route 1: Lightroom Classic (if you already subscribe) and Adobe Bridge (free)
Lightroom Classic is not a free route: it needs a Creative Cloud photography plan, which costs more per year than a dedicated metadata editor does once. If you already pay for it, though, the fields are in the Library module’s Metadata panel; choose the IPTC or Location preset from the panel’s pop-up to see Sublocation, City, State / Province, Country and ISO Country Code together. For photos that have coordinates, Lightroom shows address suggestions in italics next to the empty fields, provided Catalog Settings ▸ Metadata ▸ Reverse Geocoding is enabled; click a suggestion to accept it into the field, or type over it. (There’s a second checkbox there, Export reverse geocoding suggestions when address fields are empty, which writes the suggestions into exported copies without ever putting them in your originals: convenient, and the reason some people’s exports have names their catalogue doesn’t.)
To do a batch: fill in the fields on one photo, select the rest of the shoot, and use Metadata ▸
Sync Metadata, ticking only the location fields; or copy and paste metadata between selections.
The values then live in the catalogue until you save them to the files (⌘S in the Library module, or
the Automatically write changes into XMP setting), and for proprietary RAW files they go into a
.xmp sidecar rather than the RAW itself.
Adobe Bridge is the free one: it needs an Adobe account but no subscription, and does the same job for a folder of files rather than a catalogue: select the files, File ▸ File Info, and fill in the location fields on the IPTC tab; with several files selected the values are written to all of them. Tools ▸ Replace Metadata applies a saved template to a selection, which is the Bridge way to stamp a whole shoot. Bridge writes into the file directly, both the IIM block and the XMP packet, and into sidecars for RAW files.
Neither offers a map to work from, and neither proposes names for files without coordinates, so for a trip’s worth of GPS-less camera files you type every location by hand.
Route 2: ExifTool (free, command line)
ExifTool is the command-line tool that almost every metadata editor, including Lightroom’s rivals and mine, is built on. With its Metadata Working Group module it writes all four fields into the XMP packet and keeps the legacy IIM block in step wherever the file has one:
# write the four fields into every file in a folder; -use MWG keeps IIM and XMP in agreement
exiftool -use MWG -Location="Bennelong Point" -City=Sydney \
         -State="New South Wales" -Country=Australia \
         -codedcharacterset=utf8 -overwrite_original /path/to/folder

# fill City, State and Country from the coordinates using the built-in offline database
exiftool "-geolocate<gpsposition" -codedcharacterset=utf8 -overwrite_original /path/to/folder

# see what's there, both copies side by side
exiftool -iptc:all -xmp-photoshop:all -xmp-iptccore:all -a -G1 photo.jpg
Two things to know. The -codedcharacterset=utf8 flag matters for any name with an accent: the
IIM block predates Unicode and defaults to Latin-1, and without the flag Zürich and São Paulo
can come out mangled in software that reads the legacy copy. And -geolocate (ExifTool 12.78 or
later) fills in the nearest populated place from the gazetteer, which means the town and its
region, not a landmark or street; check the result on a rural batch before trusting it.
ExifTool does exactly what you tell it, to every file you point it at, with no preview and no map. For a scripted workflow that’s the attraction; for “which of these 400 files were taken in the old town and which across the river” it isn’t.
Route 3: Media Location Tagger (proposes, you decide, writes to the file)
Media Location Tagger is built around the two situations this guide keeps coming back to: files that have coordinates and need names, and files that need both. It shows every file on a map, proposes names, and writes nothing until you press an Apply button.
For files that already have coordinates (iPhone and other phone photos, GPS-equipped cameras, anything already geotagged):
- Drop the files or folders on the window. The GPS column shows a green tick for each; the IPTC column shows a grey “no data” icon or a warning triangle for a partial set.
- Read the proposals. As soon as the files are loaded, the app looks up each one in its built-in offline database and shows the results as greyed-out text in the sidebar and the columns. Grey means proposed, not yet in the file. No connection needed, no rate limit, so a thousand files take about as long as ten.
- Select the files to fill in. Work place by place: select everything from one town, and the sidebar shows each field’s shared value, or multiple values where the selection disagrees.
- Set each field. Click the pop-up next to Sub-location, City, Province/State or Country. The menu offers the proposed value, the values from any pins you’ve dropped, and every value already used by other files in the batch, which is how you copy one file’s naming to the rest. Pick one, or type exactly what you want, then click that field’s Apply button.
- Verify. The IPTC column turns to a green tick when all four fields are present; a warning triangle means some are still empty, which is fine if that’s what you intended.
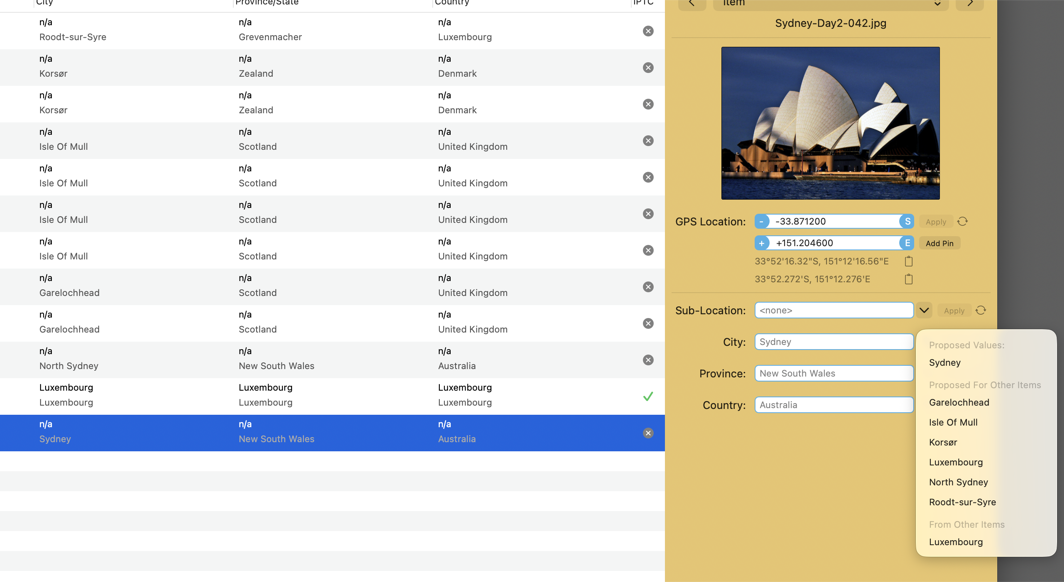
Each field’s pop-up: the offline proposal, the names of any pins on the map, and the values already in use elsewhere in the batch.
For files without coordinates (a camera with no GPS), the same sidebar is fed from the map instead. Type the place into the map’s search field the way you would in Apple Maps, a landmark, a town or a street address, pick it from the suggestions, and drop a pin there; the pin’s Apple Maps names appear alongside its coordinates, ready to edit and apply together with them. The geotagging guide walks through that; a mixed batch of phone and camera files is handled in one session, and the phone files’ names can be applied to the camera files with the pop-up.
What sets it apart for this particular job:
- Your wording, in bulk. New South Wales instead of NSW, the local spelling instead of the English one, a sub-location convention of your own: type it once, apply it to the selection, move to the next place. The tool proposes; the file says what you decided.
- Both copies, kept in step. Every write goes into the XMP packet and, where the file has one, the legacy IIM block, following the MWG rules; any file whose two copies already disagree is flagged in the table, field by field, so you can see what another tool left behind before you overwrite it.
- RAW, HEIC and video included. The fields are written into CR2, CR3, NEF, ARW, RAF, ORF, RW2, PEF and DNG in place, no sidecar, and into HEIC, MOV and MP4, whose only home for them is the XMP packet.
- Single-field removal. The Location menu clears one field across a selection (Remove City, Remove Province/State and so on) or all four at once, without touching the coordinates.
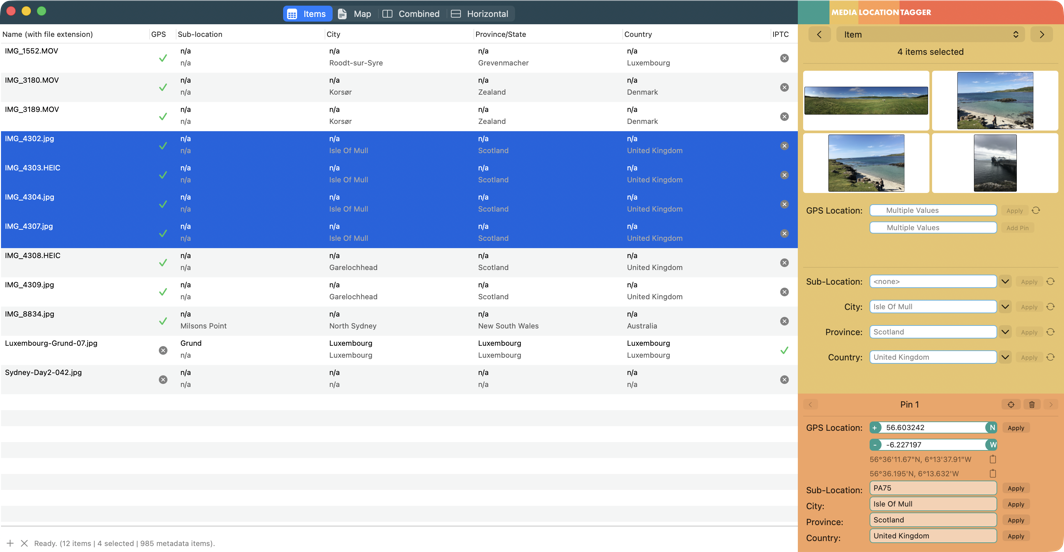
A batch of iPhone photos: coordinates present, names absent, proposals waiting in the sidebar.
It runs on macOS 13.5 Ventura or later on Apple Silicon and Intel, is US$29.95 / €29.95 as a one-time purchase, and has a free trial. The manual’s step-by-step pages cover the same two workflows with the app’s own labels: filling in the names on iPhone photos and putting your own names into the fields.
Two copies of every name: the legacy and XMP problem
The reason this section exists is a support question I get in several forms: “Lightroom shows Sydney, Photo Mechanic shows nothing”; “the agency’s form filled in the old city from last year’s trip”; “I fixed the country and it came back”. All three are the same fault. The file has two copies of its place names, one in the IIM block and one in the XMP packet, and some tool along the way updated one without the other. Applications differ in which copy they read first, so the same file reports two different places depending on where you open it.
It happens when an old tool that predates XMP writes IIM only; when a script writes the XMP tags and
forgets the legacy ones; when a sidecar is edited and the embedded copy isn’t; or when a file is
edited in a RAW converter that only knows XMP and then in a picture-desk tool that only reads IIM.
To see it, run the ExifTool inspection command above with -a -G1, which lists both copies with
their group names. To fix it, write the fields again with something that writes both: Bridge,
ExifTool with -use MWG, or Media Location Tagger, which flags the disagreement in orange per field
and resolves it on the next apply.
Common pitfalls
- Expecting Photos to write the names. It won’t, not into originals and not into exports. Anything that reads the IPTC fields sees blank ones.
- Accepting the abbreviation. Geocoders return NSW, CA, BC. If the archive is meant to be readable by people outside the country, spell the state out.
- Mixing spellings across trips. Wien in 2023 and Vienna in 2025 puts the same city in two places in every search and every catalogue filter. Settle the convention and, when in doubt, search the batch for the existing spelling and reuse it.
- Filling the sub-location with the city. It’s the most common way the field gets wasted; if there’s nothing more specific to say, leave it empty.
- Non-ASCII names in the legacy block. The XMP copy is always UTF-8; the legacy IIM block
isn’t unless the character set is declared (ExifTool’s
-codedcharacterset=utf8; Bridge does it for you), and software that reads only the legacy copy may show Zürich without it. - Names without coordinates, or the reverse. The fields are independent, so a file can carry either. If you want the location to be both precise and readable, it needs both; put the coordinates in first and derive the names from them.
- Sidecar-only edits. Names written into a
.xmpsidecar are seen by the RAW converter that wrote them and not much else. If the RAW files go anywhere on their own, write into the file. - Cloud placeholders. A folder set to optimise storage holds stubs; download the originals before tagging.
FAQ
What is IPTC metadata? A set of text fields inside an image file, standardised by the International Press Telecommunications Council, for caption, credit, copyright, keywords, and the place a picture was taken. The location part is sub-location, city, state or province and country, stored both in the legacy IPTC block and in the XMP packet.
What’s the difference between EXIF and IPTC location? EXIF holds the numbers, written by the device: latitude, longitude, altitude, direction. IPTC holds the words, written afterwards by a person or a lookup. Photos and Google Photos use the numbers; Lightroom, agencies and DAMs use the words.
Why do my iPhone photos have GPS but no city or country? Because the iPhone writes only coordinates, and Photos shows a name it looks up on the fly. The IPTC fields stay empty until something writes them.
Does Apple Photos write city and country into exported photos? No. An export with Location Information ticked carries the GPS coordinates only; the place-name fields are empty.
How do I add city and country to hundreds of photos at once? Group them by place and apply the four fields to each group: Sync Metadata in Lightroom Classic, a template in Bridge, one ExifTool command per folder, or select-and-apply per field in Media Location Tagger, which also proposes the names from the coordinates.
Can I add place names to RAW files? Yes. ExifTool and Media Location Tagger write them into CR2, CR3, NEF, ARW, RAF, ORF, RW2, PEF and DNG directly; Lightroom and Bridge write a sidecar for proprietary RAW formats instead.
Can I add place names to a photo that has no GPS? Yes; the fields don’t depend on the coordinates. But a photo with names and no coordinates won’t appear on any map, so it’s usually better to add both.
Which field does a landmark go in? Sub-location. City is the town it’s in; a district or neighbourhood can go in Sub-location too, if that’s your convention.
Do I need the ISO country code? Only if the recipient asks for it (some agencies do). Lightroom, Bridge and ExifTool can write it; it’s a two-letter code such as AU or DE.
Why does Lightroom show a different city from Photos for the same photo? Both are looking the coordinates up in different map services, and neither has read anything from the file. Writing the names into the IPTC fields ends the disagreement.
Frank Reiff is the developer of Media Location Tagger, A Better Finder Attributes and A Better Finder Rename, Mac file-management utilities in continuous development since 1996. Related: What is geotagging?, How to geotag photos on a Mac, How to remove metadata from photos, or get in touch with a location-metadata problem this guide doesn’t cover.