Applies to macOS Ventura through macOS 26
The short answer: on a Mac you can geotag photos four ways. Assign a location in Apple Photos (free, but it lives in the Photos library, not the file, until you export a copy). Drag photos onto the map in Lightroom Classic (if you subscribe; it writes to the catalogue until you save metadata). Use the free, open-source GeoTag app or the command-line ExifTool to write coordinates straight into JPEGs. Or use a dedicated editor when you have hundreds of files, RAW originals, videos, or want the city and country names written in as well. The one thing to settle first is where you want the location to end up: inside the file, or inside an app.
A disclosure: I’m the developer of Media Location Tagger, the dedicated editor in the last of those four routes. The free ones are covered first, honestly.
Three boundary checks, because adding is only one of the location jobs:
- You want to add a location to photos that have none → this guide.
- Your photos have coordinates but show blank city and country fields after export → fill in the place names.
- The location is wrong → fix the location.
- You want to remove the location before sharing → the remove-metadata guide.
If you’re not sure what a geotag is made of (coordinates versus place names, EXIF versus IPTC), the explainer covers that in five minutes; this guide assumes it.
Does your camera record GPS at all?
Probably not. Built-in receivers are rare in interchangeable-lens cameras, and the situation as of 2026 is roughly this (check your model’s manual; makers change things between bodies):
| Maker | Built-in GPS | Otherwise |
|---|---|---|
| Canon | A few bodies: EOS 5D Mark IV, 6D and 6D Mark II, EOS R3 | Bluetooth link to the Camera Connect app |
| Nikon | Some older DSLRs (D5300) and rugged Coolpix models; no Z-series body | SnapBridge app |
| Sony | None in the Alpha line | Creators’ App (formerly Imaging Edge Mobile) location link |
| Fujifilm | None in the X or GFX lines | XApp location sync |
| Panasonic, OM System / Olympus, Leica | None in current bodies | LUMIX Lab, OM Image Share, Leica FOTOS |
| Phones, GoPro, drones | Yes |
The app links all work the same way: the phone records its position and pushes it to the camera over Bluetooth, which writes it into each shot. They also fail the same way: the app has to be running and connected for the whole session, the link drops when the phone sleeps or you switch apps, and you find out at the end of the day that the last three hours have no location. Which is how most people arrive at this article.
If your camera does record GPS, you don’t need to add locations; you may still want to add the place names or correct the occasional bad fix.
First decide: into the file, or into the app?
Apple Photos and Lightroom both let you put photos on a map with a few clicks. What they don’t do, by default, is change the file. The location goes into the library or catalogue, and the file on disk stays exactly as the camera wrote it, with no coordinates.
That is fine if the photos will live in that app forever. It bites in four situations:
- You export. Photos writes the location into exported copies only if the Location Information box is ticked, and never into an “unmodified original” export.
- You use two apps. A location assigned in Photos is invisible to Lightroom, and vice versa, because each reads the file and finds nothing.
- You back up originals. The archive drive has the files, not the database. Years of location work are in the library, and only there.
- You switch apps, or hand files to someone. Same thing, with more at stake.
Writing the location into the file avoids all four. Every application reads it, every export and backup carries it, and it’s still there when today’s software is gone. The rest of this guide is sorted accordingly: the in-app routes first, because they’re free and already installed, then the routes that write to the file.
Free route 1: Apple Photos (into the library)
- Select one photo, or every photo taken at the same place (⌘-click to add, shift-click for a range).
- Press ⌘I. In the Info panel, click Assign a Location and type a place: an address, a landmark, a town. Pick the suggestion that fits, and the photos get a pin.
- To move a pin, drag it on the map in the Info panel; to remove it, choose Image ▸ Location ▸ Remove Location.
Multi-selection makes this workable for a trip: select the day’s photos, assign the town, done. The limits: it’s the library only (see above); it’s one location per selection with no way to see several pins at once while working; and the map search occasionally decides that the coordinates you pasted are an address and offers you the wrong continent, a known Sequoia-era quirk.
To get the assigned location into a file, export: File ▸ Export ▸ Export Photos, and tick Location Information. The exported JPEG or HEIC carries the coordinates, and only those: no city, state or country is written, and the GPS timestamp in the copy is the moment of the export, not of the shot. Export Unmodified Original leaves the file as imported, without the location; ticking Export IPTC as XMP on that dialog writes a sidecar file next to it, which some applications read and most don’t.
Free route 2: Lightroom Classic’s Map module (into the catalogue, then the file)
If you already pay for Lightroom Classic, the Map module is the natural place: select photos in the filmstrip and drag them onto the map, or right-click a spot and choose Add GPS Coordinates to Selected Photos. It can also load a GPX track log recorded by a phone or a GPS watch and match photos to it by time (Map ▸ Tracklog ▸ Load Tracklog, then Auto-Tag). You must be online for the module to work at all.
The coordinates go into the catalogue. To get them into the files, select the photos in the Library
module and press ⌘S (Metadata ▸ Save Metadata to File), or turn on Catalog Settings ▸ Metadata ▸
Automatically write changes into XMP. For JPEG, TIFF, PSD and DNG the data is embedded; for
proprietary RAW formats (CR3, NEF, ARW, RAF and so on) Lightroom writes an .xmp sidecar file
alongside the RAW instead, which travels with the RAW only if you remember to copy both. The italic
city and country suggestions the Metadata panel shows are not in the file either, until you click
each one to accept it.
The cloud-based Lightroom (non-Classic) has no map editing at all.
Free route 3: GeoTag and ExifTool (into the file)
GeoTag is a free, open-source Mac app with one window: a map on one side, a file list on the other. Drop files, click the map, save. It writes EXIF GPS into JPEGs and other formats ExifTool can handle, and it’s the right answer for “I have twenty JPEGs from one place and don’t want to pay for anything”.
ExifTool is the command-line tool that almost every metadata utility, including the two above and mine, is built on. To write coordinates by hand:
# decimal degrees; the Ref tags carry the hemisphere, the values are unsigned
exiftool -GPSLatitude=48.8584 -GPSLatitudeRef=N \
         -GPSLongitude=2.2945 -GPSLongitudeRef=E \
         -overwrite_original photo.jpg

# match a folder of photos to a GPX track log by capture time
exiftool -geotag track.gpx -overwrite_original /path/to/folder
The gotcha is the four-tag structure: EXIF stores latitude and longitude as positive numbers and
puts the sign in the separate Ref tag. Forget the Ref, or pass a negative number without it, and
the photo lands in the wrong hemisphere, typically in the ocean off West Africa. ExifTool also
writes place names into the IPTC fields (-City=Sydney -Country=Australia -State="New South Wales"
-Sub-location="Bennelong Point") and geotags videos and RAW files; it just doesn’t show you a map,
a preview, or what it’s about to do.
The batch tool: Media Location Tagger (into the file, with a map)
Media Location Tagger is built for the situation this guide started with: a card full of files from a camera that recorded nothing, which need locations and place names written in, and a map to do it on rather than a text field. It’s a location editor, not a photo manager, and it changes nothing until you press an Apply button.
- Drop the files or folders on the window. Each file becomes a row, and the GPS and IPTC columns show at a glance what each one already has: for a GPS-less camera, a grey “no data” icon in both.
- Find the place on the map. The search field takes a landmark, a town or a street address and offers the same autocomplete as Apple Maps.
- Drop a pin. The sidebar shows the pin’s coordinates and the place names Apple Maps knows for that spot: sub-location, city, state or province, country. Take them as they are, or type your own.
- Select the files taken there. One, fifty, or the whole batch: click the first, shift-click the last to select a range, ⌘-click to add or drop individual files, ⌘A for everything.
- Apply the coordinates, then apply the place names field by field: Sub-location, City, Province/State, Country. Edit them first if you’d rather have “New South Wales” than “NSW”, or the local spelling rather than the English one. The columns switch to green ticks as the fields fill.
- Next location. For a trip, drop one pin per place and repeat; the arrow buttons step through the pins, and each keeps its own suggestions.
A shortcut worth building into your shooting habit: at every new stop, take one photo with your phone. Back at the Mac, load the phone shots alongside the camera files, select the phone photo for a stop, click Add Pin next to its coordinates, select the camera shots from the same stop and apply. No searching, no track log, no clock matching, and the phone photo is your visual record of which stop was which.
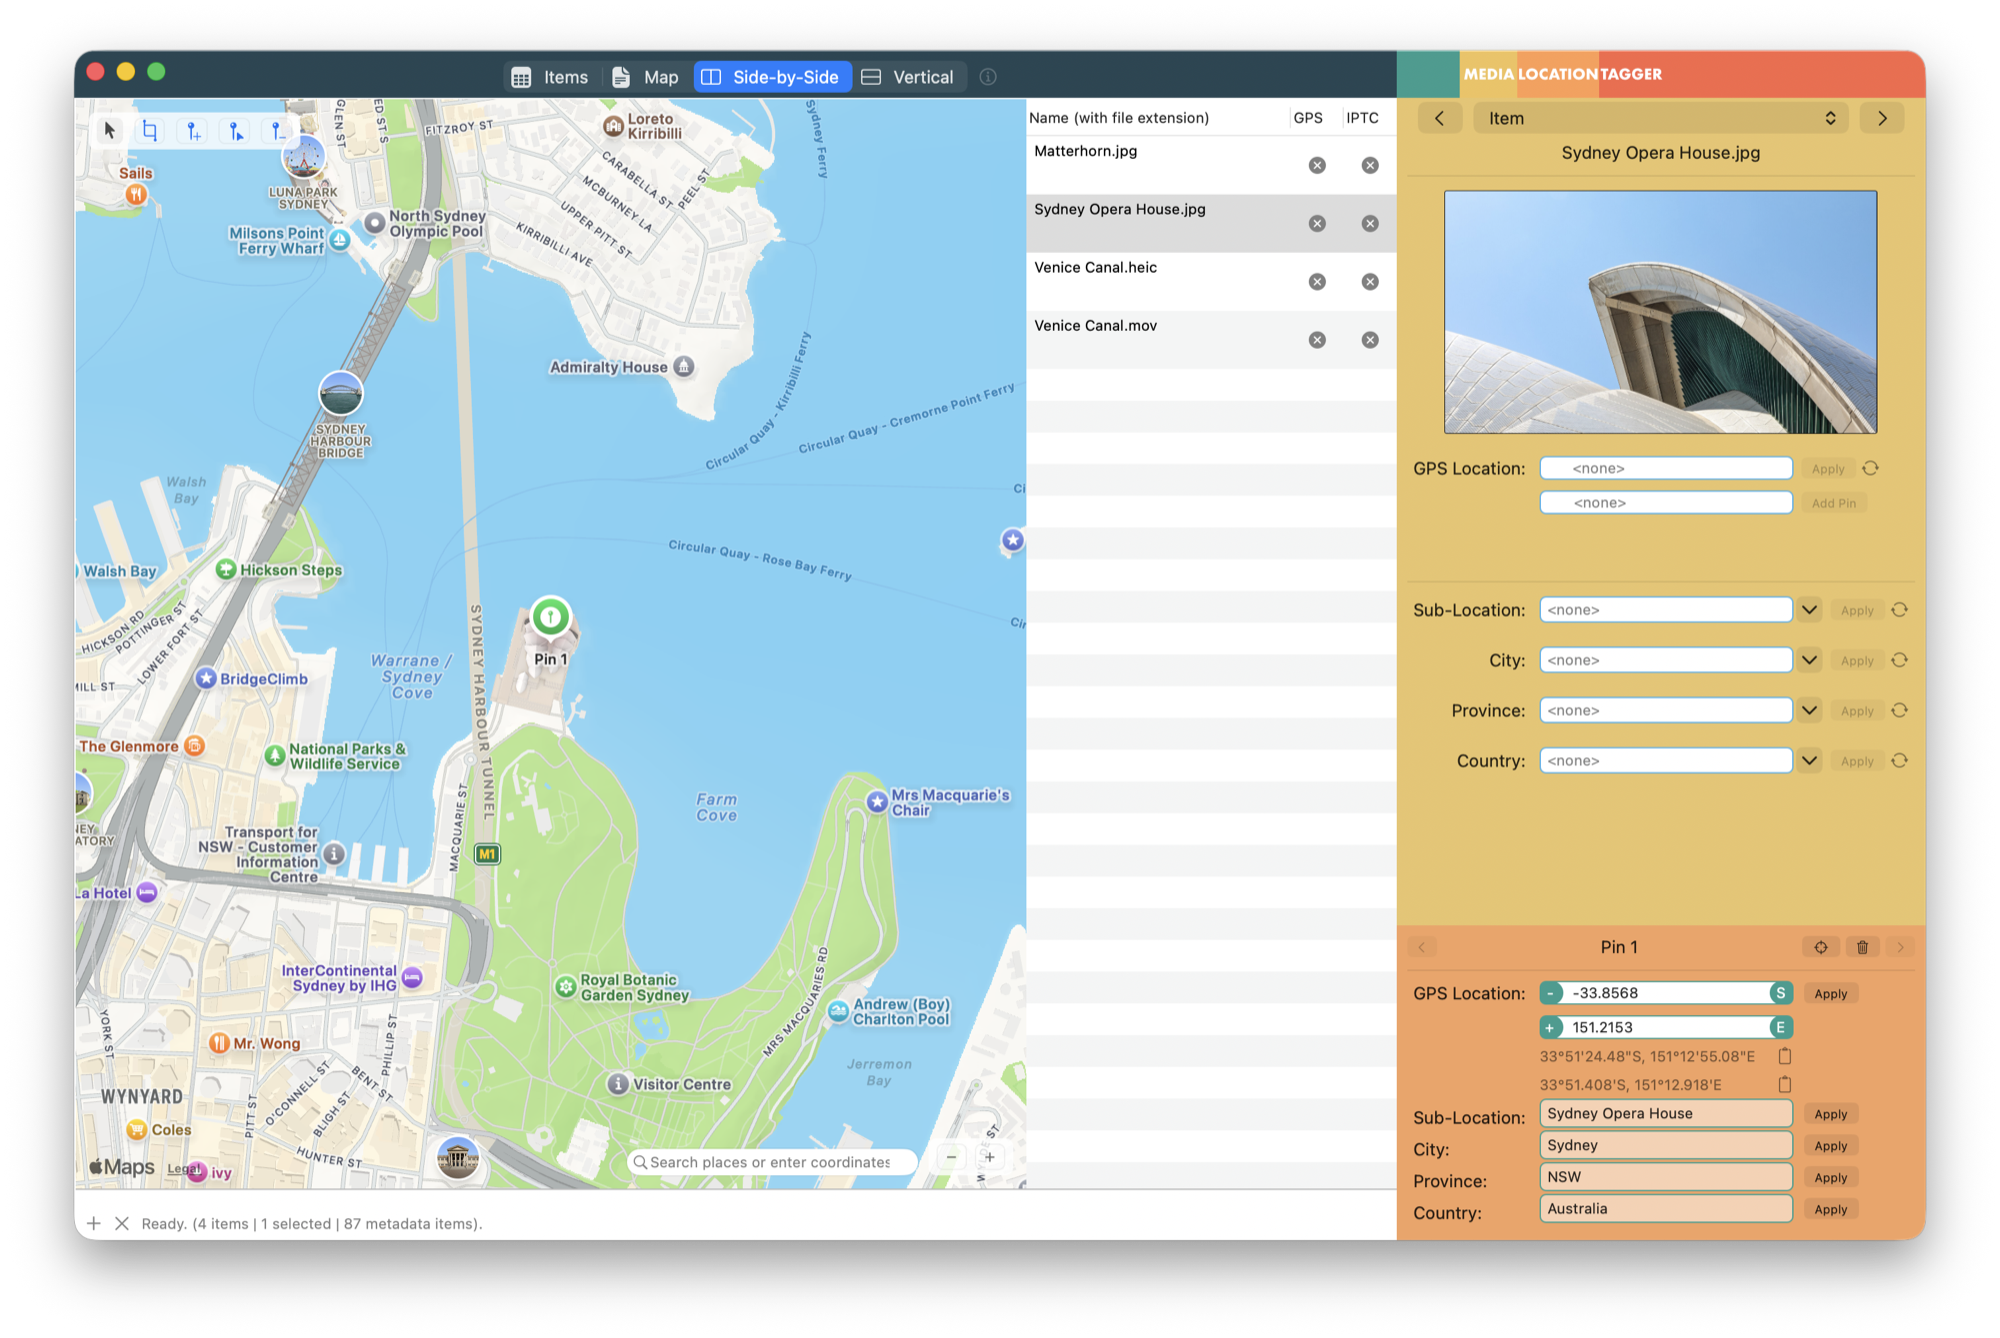
A batch from a GPS-less camera, a pin on the map, and the coordinates and names about to be applied to the selected files.
What sets it apart from the routes above, in the order it tends to matter:
- Place names, not just coordinates. The IPTC fields are written into the file, in whatever wording you choose, so the location reads the same in Lightroom, a stock agency’s form, a DAM, or a web gallery. Apple Photos and GeoTag write coordinates only.
- RAW files, written in place. Sony ARW, Canon CR2 and CR3, Nikon NEF, Fujifilm RAF, Olympus ORF, Panasonic RW2, Pentax PEF, DNG and the other current formats get the location inside the RAW itself, no sidecar to lose. Lightroom will pick it up when you read the file’s metadata.
- Videos. MOV and MP4 from any camera get coordinates in the QuickTime container, where Photos and Final Cut look for them.
- Both copies of the metadata. Files that carry an XMP packet get it updated alongside the EXIF and IPTC, so no application sees a stale location; and when the two copies already disagree, the file is flagged so you can see which is which.
- It shows you first. Every file’s current location is visible on the map before you touch anything, which is how you notice the three shots that had a stale location from the previous trip.
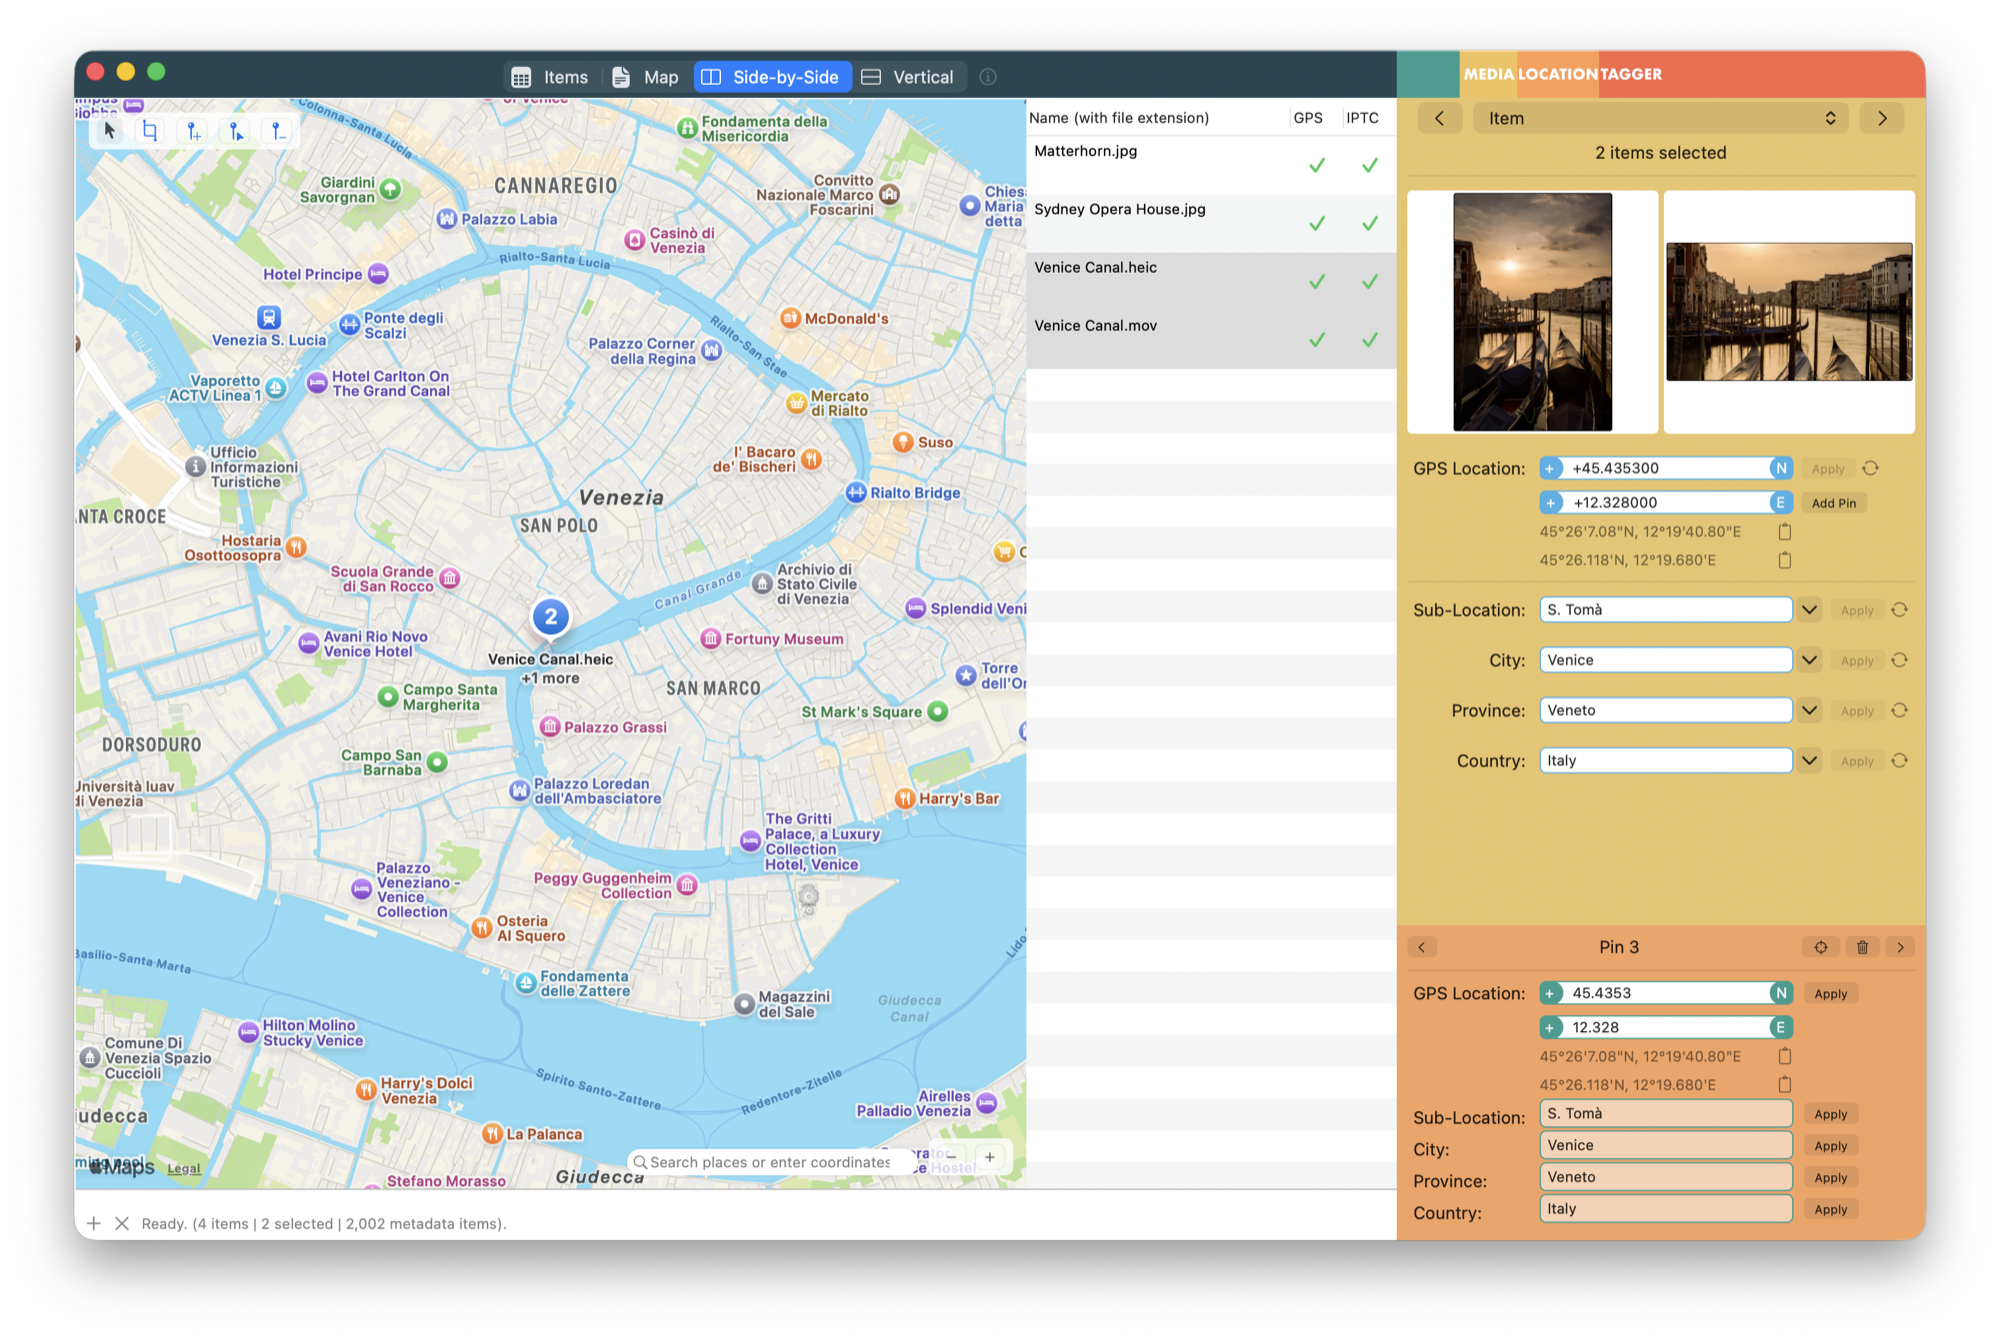
After applying: coordinates and place names in every file, one pin per stop.
Formats: JPEG, HEIC, TIFF, PNG, the RAW formats above, MOV, MP4 and the other QuickTime-based video containers. Read-only exceptions are the ones ExifTool itself can’t write (AVI, MKV, and a few discontinued RAW formats). It runs on macOS 13.5 Ventura or later on Apple Silicon and Intel, is US$29.95 / €29.95 as a one-time purchase, and has a free trial. The manual’s step-by-step page walks through the same workflow with the app’s own labels.
Geotagging RAW files
Two things to know. First, writing metadata into a RAW file is safe in the formats above; the image data is untouched and every RAW converter reads the result. The days of “never write to a RAW” are long gone; the makers themselves write GPS into RAW files when the camera has a receiver. Second, if you use Lightroom Classic or Capture One with sidecars, you have a choice: tag the RAW itself (then tell the converter to re-read the file’s metadata) or let the converter put the location in its sidecar. Mixing the two produces the “two locations for one file” confusion; pick one and stick to it.
Geotagging videos
MOV and MP4 files store the coordinates in the container’s own metadata, not in EXIF, so many
image-focused tools don’t read or write them. Photos, Final Cut Pro and iMovie read them; a phone
writes them. To add them after the fact, use ExifTool (-Keys:GPSCoordinates="48.8584, 2.2945") or
an editor that knows the video fields; the same pin-and-apply workflow above works on a MOV as on a
JPEG. Note that most video editors strip location on export, so tag the final export, not the source
clips.
When you need a track log instead
If you carried a GPS logger, a watch, or a phone app recording a GPX track, the fastest way to tag a
whole day is to match photos to the track by time. That’s a different workflow from placing pins:
Lightroom Classic’s Map module and ExifTool’s -geotag both do it, and there are dedicated
track-log tools if you do this every week. Media Location Tagger doesn’t read track logs. It does
the other thing well: the day you didn’t record a track, the old archive, the shots the app link
missed, the files that need names as well as numbers.
Common pitfalls
- Assigning in Photos and expecting Lightroom to see it. It won’t; see “into the file, or into the app”. Export with location, or tag the file.
- The hemisphere sign. Coordinates west of Greenwich and south of the equator are negative in
decimal notation (
-33.8568, 151.2153is Sydney;33.8568, 151.2153is off the coast of Japan). Map-pin tools avoid the problem; typed coordinates and copied Google Maps values don’t. - Pasting coordinates into Photos’ location field. Photos treats the text as an address search and may offer something unrelated; use decimal degrees with a comma, in English number format.
- Tagging copies instead of originals. The opposite of the sharing advice: for adding a location you want the originals tagged, so that every future export inherits it.
- Cloud placeholders. A Photos library or iCloud Drive folder set to “optimise storage” holds stubs, not files. Download the originals before tagging them.
- Finder tags and album names aren’t metadata. A folder called “Sydney 2025” tells the Finder something and the file nothing. Only the embedded fields travel with the file.
- Time zones, for track logs only. Matching photos to a GPX track depends on the camera clock being right, including the time zone. Pins don’t care.
FAQ
How do I geotag photos on a Mac for free? Apple Photos: select, ⌘I, Assign a Location; the location stays in the library until you export with Location Information ticked. To write into the file for free, the open-source GeoTag app (map pins, JPEG-centric) or ExifTool (command line, any format).
Can I add a location to photos taken with a DSLR or mirrorless camera? Yes. The files simply have empty GPS fields, and any of the routes above fills them. The camera doesn’t need to be involved; you’re editing the files it produced.
Does Apple Photos write the location into the file? Not into the original. It stores the location in the library and writes it into exported copies when the export option is on.
How do I geotag hundreds of photos at once? Group them by location and apply one pin per group. Photos handles a multi-selection; Lightroom drags a selection onto the map; Media Location Tagger is built around it, including the place names and RAW files.
Can I geotag RAW files? Yes: ExifTool and Media Location Tagger write into CR2, CR3, NEF, ARW, RAF, ORF, RW2, PEF and DNG directly; Lightroom writes a sidecar instead.
How do I add GPS coordinates to a photo manually? Type them into ExifTool with the four EXIF tags, or paste decimal coordinates into a map search field and drop a pin. Watch the sign of southern and western coordinates.
Does geotagging change image quality? No. Metadata lives alongside the image data; writing it doesn’t touch the pixels.
Can I geotag scanned photos? Yes, the same way; a scan is just a JPEG or TIFF with no location. Combined with setting the date they were taken, it’s how an old family archive becomes browsable by place and time.
Frank Reiff is the developer of Media Location Tagger, A Better Finder Attributes and A Better Finder Rename, Mac file-management utilities in continuous development since 1996. Related: What is geotagging?, Rename photos by the date they were taken, or get in touch with a location problem this guide doesn’t cover.