Applies to macOS Ventura through macOS 26
The short answer: at every place you stop to shoot, take one photo with your iPhone as well. The phone records the coordinates; the camera doesn’t. Back at the Mac, load the phone shots and the camera shots together, and for each stop use the phone photo’s coordinates as the location for the camera photos taken there. That’s the whole method. It needs no GPS logger, no GPX track, no Bluetooth link between camera and phone that has to stay alive all day, and no matching of camera clocks to anything. It costs one extra press of the phone’s shutter per stop, and the phone shot doubles as your note of which stop was which.
A disclosure: I’m the developer of Media Location Tagger, which has a button for exactly this. The method works with ExifTool too, and that route is described first.
Boundary checks:
- Your camera does record GPS, or you use the maker’s phone-app link and it works for you → you don’t need this; the general geotagging guide covers the rest.
- You carried a GPS logger or a tracking app → match the photos to the track by time instead
(Lightroom Classic’s Map module, ExifTool’s
-geotag); the phone-shot method is for the days you didn’t. - You want place names written as well as coordinates → this guide does that in the same pass; the place-names guide explains the fields.
Why this beats the alternatives for most people
The three usual ways to get a location onto photos from a GPS-less camera all have a running cost:
- The maker’s phone-app link (Canon Camera Connect, Nikon SnapBridge, Sony’s Creators’ App, Fujifilm XApp) pushes the phone’s position to the camera over Bluetooth. It works while the app is open and connected, and it drops when the phone sleeps, when you switch apps, when the battery saver kicks in. You find out at home. Some cameras then keep stamping the last position they received, which is worse than nothing.
- A track log (a GPS watch, a logger, a tracking app) records where you were all day, and the photos are matched to it by time afterwards. Reliable, but it needs the camera clock set to the second and the right time zone, the logger charged and running, and a matching step with its own gotchas.
- Placing pins by hand on a map afterwards, from memory. Fine for five stops, not for thirty, and a year later you don’t remember which side of the river you were on.
One phone photo per stop replaces all three. The phone is already in your pocket and already records coordinates on every shot. There’s no link to maintain and no clock to synchronise, because you’re not matching by time at all: you’re matching by stop, and you decide which camera photos belong to which stop by looking at them. The phone shot doesn’t have to be good; a picture of the pavement will do, though a picture of the scene is a better reminder.
The field habit
At each new place, before or after the camera shots, take one photo with the phone. That’s it. Two refinements that pay off later:
- Shoot the phone photo of the same subject. When you’re sorting at the desk, a phone shot of the cathedral next to twelve camera shots of the cathedral makes the grouping obvious.
- Check that Location Services is on for the Camera app (Settings ▸ Privacy & Security ▸ Location Services ▸ Camera ▸ While Using the App). It usually is; the day it isn’t is the day this method silently fails.
Moving through a city, “stop” means anywhere you’d want the photos to land on a map: a square, a viewpoint, a building. Within a hundred metres or so, one phone shot is enough; the camera photos from that stop all get the same pin, which is the precision most people want from a map anyway.
At the desk, route 1: ExifTool
For each stop, copy the phone photo’s GPS tags to the camera photos from that stop. ExifTool
copies tags between files with -tagsFromFile:
# copy the GPS block from the phone shot to every camera photo of that stop
exiftool -tagsfromfile IMG_4501.HEIC -gps:all -overwrite_original DSC_0231.NEF DSC_0232.NEF DSC_0233.NEF

# the same for a whole folder, if the folder is one stop
exiftool -tagsfromfile IMG_4501.HEIC -gps:all -overwrite_original /path/to/stop-1/
This copies the coordinates and the altitude, and also the phone’s GPS timestamp, which you may
prefer to leave out (-gps:all --gpsdatestamp --gpstimestamp). It writes into the camera files
in place, RAW formats included. What it doesn’t do is show you the photos, so grouping the camera
shots into stops has to happen first, in the Finder or by file-number ranges, and a wrong range
means a stop’s worth of photos tagged with the wrong square.
At the desk, route 2: Media Location Tagger
Media Location Tagger is built around pins on a map, and a selected file’s own coordinates can become a pin with one click. The workflow, per stop, takes a few seconds.
- Drop both sets on the window: the phone shots and the camera files, or the whole day’s folder. The GPS column shows green ticks on the phone shots and grey “no data” icons on the camera files, so the two sets are easy to tell apart even with similar names.
- Select the phone shot for the first stop. Its coordinates appear in the sidebar. Click Add Pin next to them. A pin lands exactly where the phone was, the map centres on it, and the pin’s section shows the place names Apple Maps knows for that spot.
- Select the camera shots from that stop. The camera numbers files in the order they were taken, so a stop is a contiguous run: click the first, shift-click the last. The thumbnails in the sidebar confirm you’ve got the right ones.
- Apply the pin’s coordinates to the selection, then the place names, field by field, editing any you’d rather have differently (New South Wales rather than NSW). The camera files’ GPS column turns green.
- Next stop. Select the next phone shot, Add Pin, select its camera shots, Apply. Thirty stops is a few minutes. The pins stay on the map, one per stop, and the arrow buttons step through them.
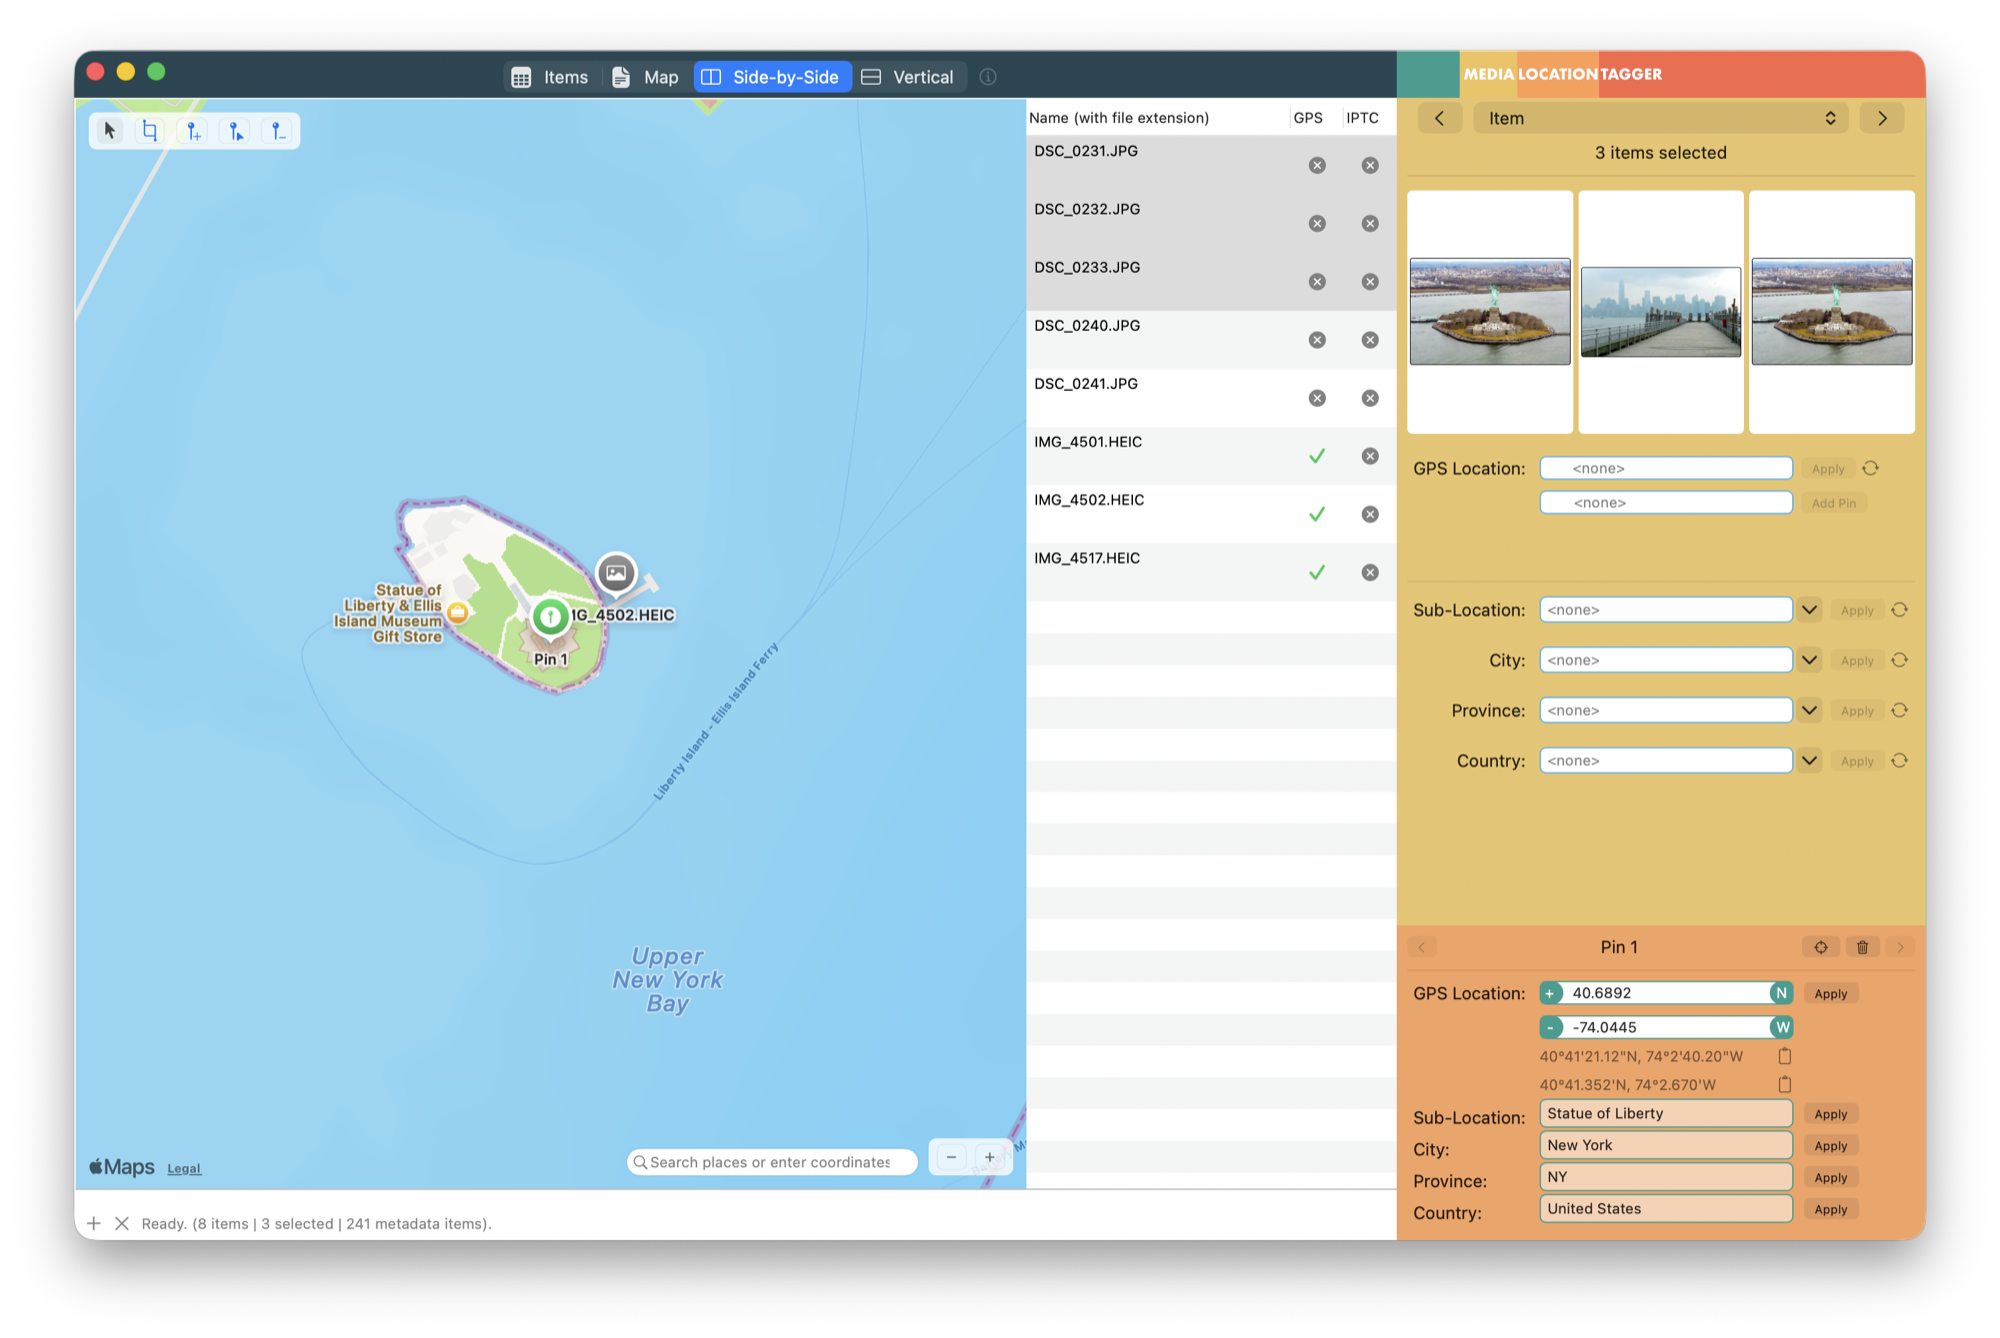
The phone shot became the pin; the camera shots from the same stop are selected and about to get its coordinates and names.
What you get that the copy-the-tags route doesn’t:
- You see what you’re doing. The phone shot and the camera shots are on screen; a misfiled photo is obvious before anything is written.
- Place names in the same pass. The pin brings the city, state and country with it; apply them and the files carry names as well as coordinates, in your wording.
- RAW and video included. The camera’s NEF, CR3 or ARW files and its MP4 clips get the location written in place, in the form each format needs.
- Nothing is copied that you didn’t ask for. Only the coordinates go across; the phone’s GPS timestamp, altitude error and heading stay with the phone shot.
It runs on macOS 13.5 Ventura or later, is US$29.95 / €29.95 as a one-time purchase, and has a free trial. The manual page for this workflow uses the app’s own labels.
Variations
- No phone shot at a stop. Drop a pin by hand: search the place in the map’s search field and use Drop a new pin. One missed stop doesn’t spoil the method.
- Two cameras and a phone. Same thing; the pin doesn’t care which camera the files came from. Mixed batches of stills and clips work too.
- The phone shot itself needs place names. It has coordinates and no IPTC names, like every phone photo. Select it along with the camera shots when applying the names, and the whole stop ends up identical.
- You already shot the trip without phone shots. Then this is the pins-from-the-map workflow instead; the phone-shot habit starts on the next trip.
- A reference from someone else’s phone. A friend’s AirDropped photo from the same spot works as a reference too, as long as it arrived with its location (AirDrop and email keep it; messaging apps strip it).
Common pitfalls
- The phone shot with no location. Indoors, in a tunnel, or with Location Services off, the phone may write nothing or its last known position. Glance at the GPS column before using a phone shot as the reference; a grey icon means find another reference for that stop.
- A stop that spans two places. A walk along a riverbank is not one stop. Take a phone shot at each end and split the camera shots between them.
- Trusting the camera’s file order across a card swap or a second body. Numbering restarts or interleaves; sort by name within one camera at a time.
- Copying with ExifTool into the wrong range. Check the first and last file of each range before running the command; there’s no undo except copying again.
- Cloud placeholders. If the phone shots live in iCloud Photos with Optimise Mac Storage on, export the originals first; a placeholder has no coordinates to read.
FAQ
Can I use my iPhone as the GPS for my camera? Yes, in two ways. The maker’s app link sends the phone’s position to the camera live, and drops out. Or take one phone photo per stop and copy its coordinates to the camera photos afterwards, which never drops out.
How do I copy the GPS location from one photo to another on a Mac? With ExifTool’s
-tagsfromfile and -gps:all, or in Media Location Tagger by selecting the source photo, clicking
Add Pin next to its coordinates, selecting the targets and applying the pin.
Does the camera clock need to match the phone? No. The method matches photos to stops by your choice, not by time, so the camera clock can be wrong by hours and it makes no difference. (A track log, by contrast, depends entirely on the clock.)
How accurate is the phone’s location? A few metres outdoors, worse in narrow streets and indoors. For “which square, which viewpoint, which building” it’s more than enough; if a particular photo needs the subject’s exact position, drop the pin on the subject instead.
Does this work with RAW files? Yes. Both ExifTool and Media Location Tagger write the location into CR2, CR3, NEF, ARW, RAF, ORF, RW2, PEF and DNG directly.
What about videos from the camera? Same workflow; the videos guide explains where the location goes in a MOV or MP4.
Is one phone shot per stop enough? For a map, yes. Everything from that stop lands on the same pin, which is how most people want to browse a trip. For per-photo precision you’d need a track log or a camera with GPS.
Frank Reiff is the developer of Media Location Tagger, A Better Finder Attributes and A Better Finder Rename, Mac file-management utilities in continuous development since 1996. Related: How to geotag photos on a Mac, Add city, state and country names to photos, What is geotagging?, or get in touch with a location problem this guide doesn’t cover.